API reference
Table of contents
- Configure
- Start
- Log Event
- Get AppsFlyerUID
- Get Advertising Identifier
- WaitForATTUserAutorization (iOS only)
- Set Customer User Id
- Set Consent Data
- Uninstall Measurement
- Set Additional Data
- Validate And Log In App Purchase
Configure
Perform internal setup: inject plugin & engine version, read developer keys from Project Settings.
See here for configuration details.
C++
static void configure();
Start
- Starts the SDK and sends the session to the server.
- By default, the
startmethod is called automatically once the app is being launched. - This setting can be disabled in the Plugin settings, to let the app developer manually control when the SDK starts. See here for more details.
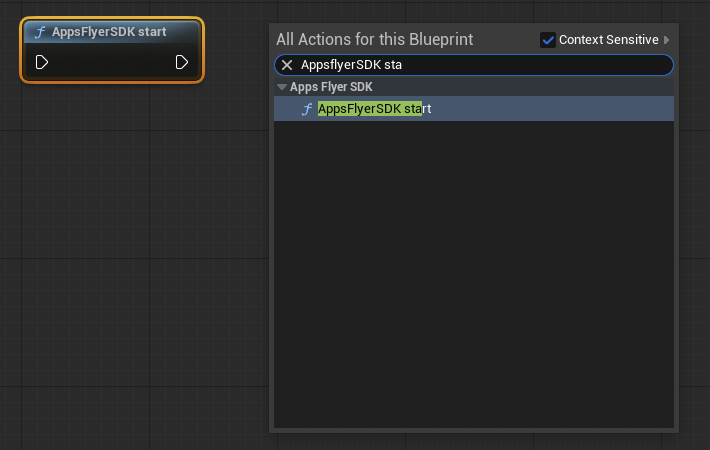
- If the Plugin is configured for a manual start, the developer should call the
startmethod under the blueprint, and configure it to be called every foreground-background transition.
Blueprint:
C++
static void start();
Log Event
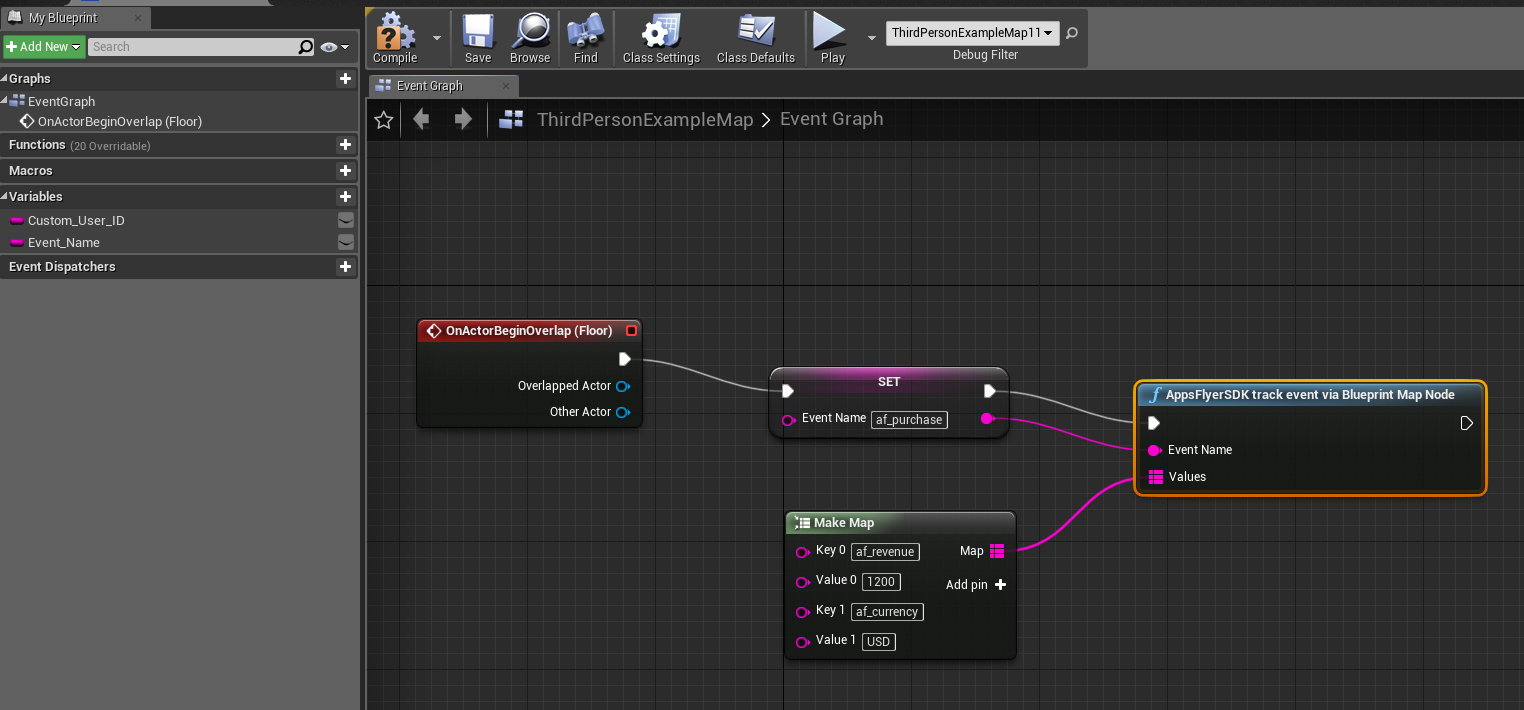
The logEvent method allows you to send in-app events to AppsFlyer.
For more information about defining in-app events, see here.
Blueprint:
C++
static void logEvent(FString eventName,
                     TMap<FString,FString> values);
- eventName – canonical AppsFlyer event code, e.g.
"af_purchase". - values – key/values payload (UTF‑8).
Special handling: on iOS the helper converts"af_revenue"string toNSNumberso you may pass"4.99"without casting.
Get AppsFlyerUID
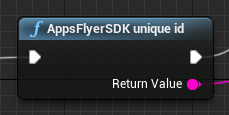
Retrieve the AppsFlyer ID (unique installation Id) from the SDK.
Blueprint
C++
static FString getAppsFlyerUID();
Get Advertising Identifier
Retrieve the advertising identifier (IDFA on iOS) from the SDK.
Note: This API is iOS-only. On Android, it returns an empty string.
C++
static FString advertisingIdentifier();
- Returns the advertising identifier string (IDFA on iOS, empty string on Android).
waitForATTUserAuthorizationWithTimeoutInterval
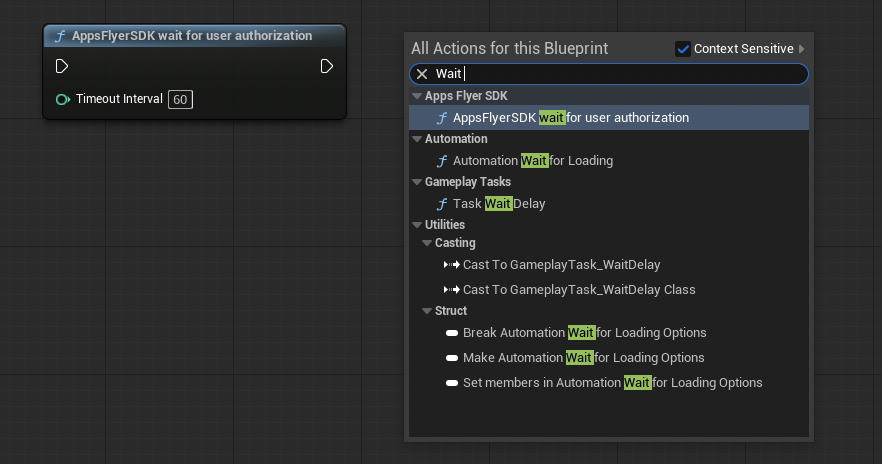
iOS 14+ utility that defers start() until user responds to the ATT prompt or the timeout elapses.
See more information about this API here.
IMPORTANT: When using this API, please perform the following:
- Set the
Automatically start the AppsFlyer SDKflag under the plugin setting tofalse. - Call the
Set Custom User IDAPI before the call to theStartAPI.
Blueprint:
C++
static void waitForATTUserAuthorizationWithTimeoutInterval(int timeoutSeconds);
Set Customer User ID
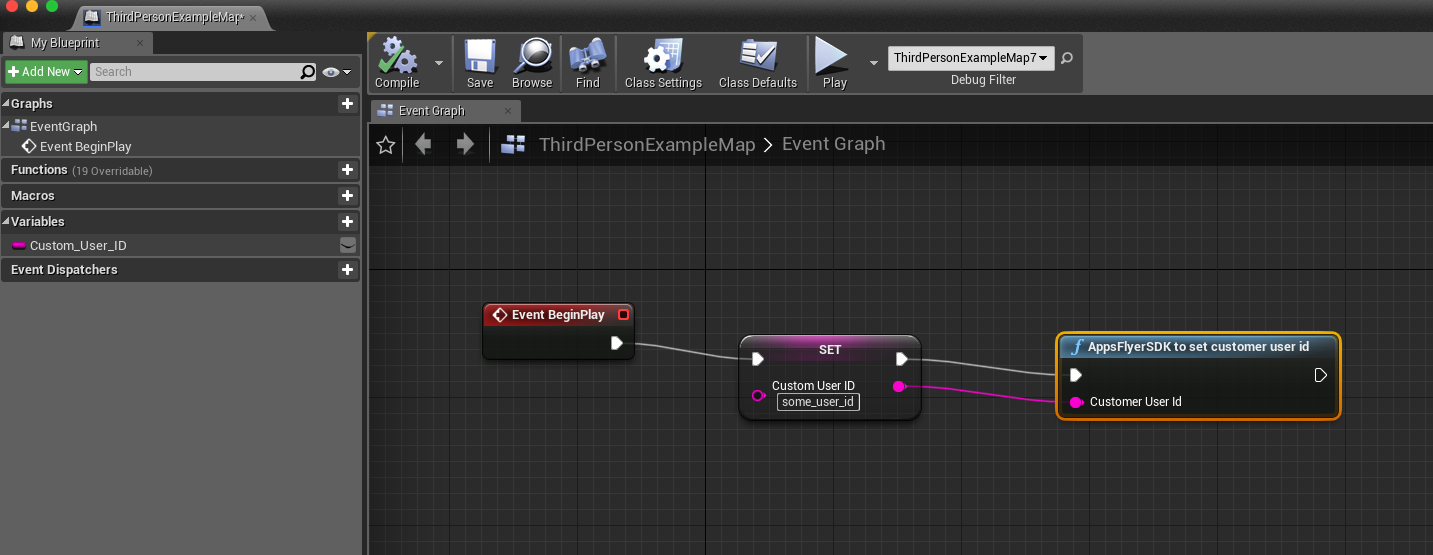
Setting your own Custom ID enables you to cross-reference your own unique ID with AppsFlyer’s user ID and the other devices IDs. This ID is available in AppsFlyer CSV reports along with postback APIs for cross-referencing with your internal IDs.
IMPORTANT: To set the user ID in the first SDK session, please perform the following:
- Set the
Automatically start the AppsFlyer SDKflag under the plugin setting to false. - Call the
Set Custom User IDAPI before the call to theStartAPI.
Blueprint:
C++
static void setCustomerUserId(FString customerUserId);
Set Consent Data
As part of the EU Digital Marketing Act (DMA) legislation, big tech companies must get consent from European end users before using personal data from third-party services for advertising.
To comply with the legislation, Google requires AppsFlyer customers to include specific consent fields when sending events originating from EU end-users to Google.
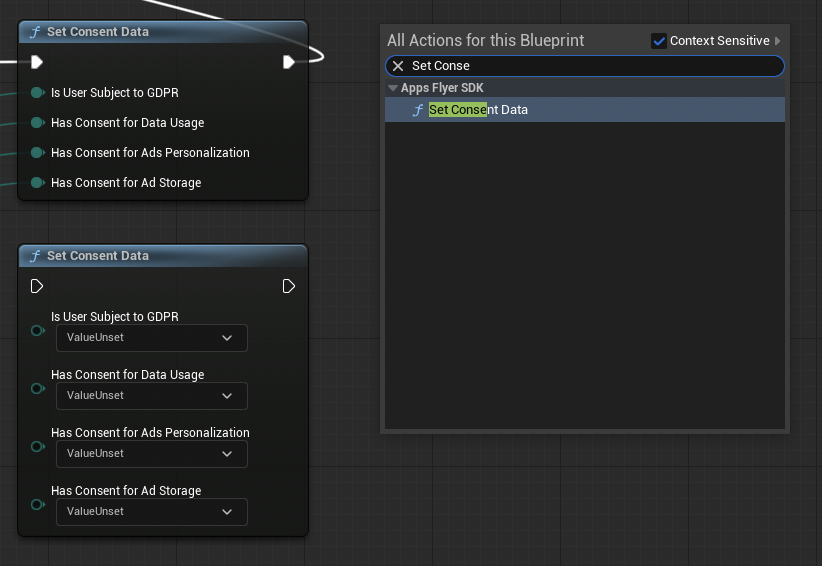
If the app collects consent information from users manually, and not via a CMP, it should use the SetConsentData API and pass the following parameters:
isUserSubjectToGDPR- Indicates whether GDPR applies to the user.hasConsentForDataUsage- Indicates whether the user has consented to use their data for advertising purposes.hasConsentForAdsPersonalization- Indicates whether the user has consented to use their data for personalized advertising.hasConsentForAdStorage- indicates whether the user has consented to store or access information on a device.
These parameters can either be preset by the developer or be set as parameters based on the end user's response.
Blueprint:
C++
// Option 1 - Use `ValueUnset` to omit a flag
static void SetConsentData(
    EAFBooleanState IsUserSubjectToGDPR,
    EAFBooleanState HasConsentForDataUsage,
    EAFBooleanState HasConsentForAdsPersonalization,
    EAFBooleanState HasConsentForAdStorage);

// Option 2 - C++ only
static void SetConsentDataTOptional(
    TOptional<bool> IsUserSubjectToGDPR,
    TOptional<bool> HasConsentForDataUsage,
    TOptional<bool> HasConsentForAdsPersonalization,
    TOptional<bool> HasConsentForAdStorage);
Uninstall Measurement
AppsFlyer uses silent push notifications, once a day, to verify if an app is still installed on a given device. If there is no response, an uninstall is recorded, and attributed to the media source that originally brought the user.
First, please make sure to read the relevant information about the uninstall feature in the AppsFlyer dashboard
iOS Uninstall
Important!
To support remote notifications in iOS follow the official unreal docs. Don't forget to download, compile, and run the Unreal Engine from the source.
Blueprint:
-
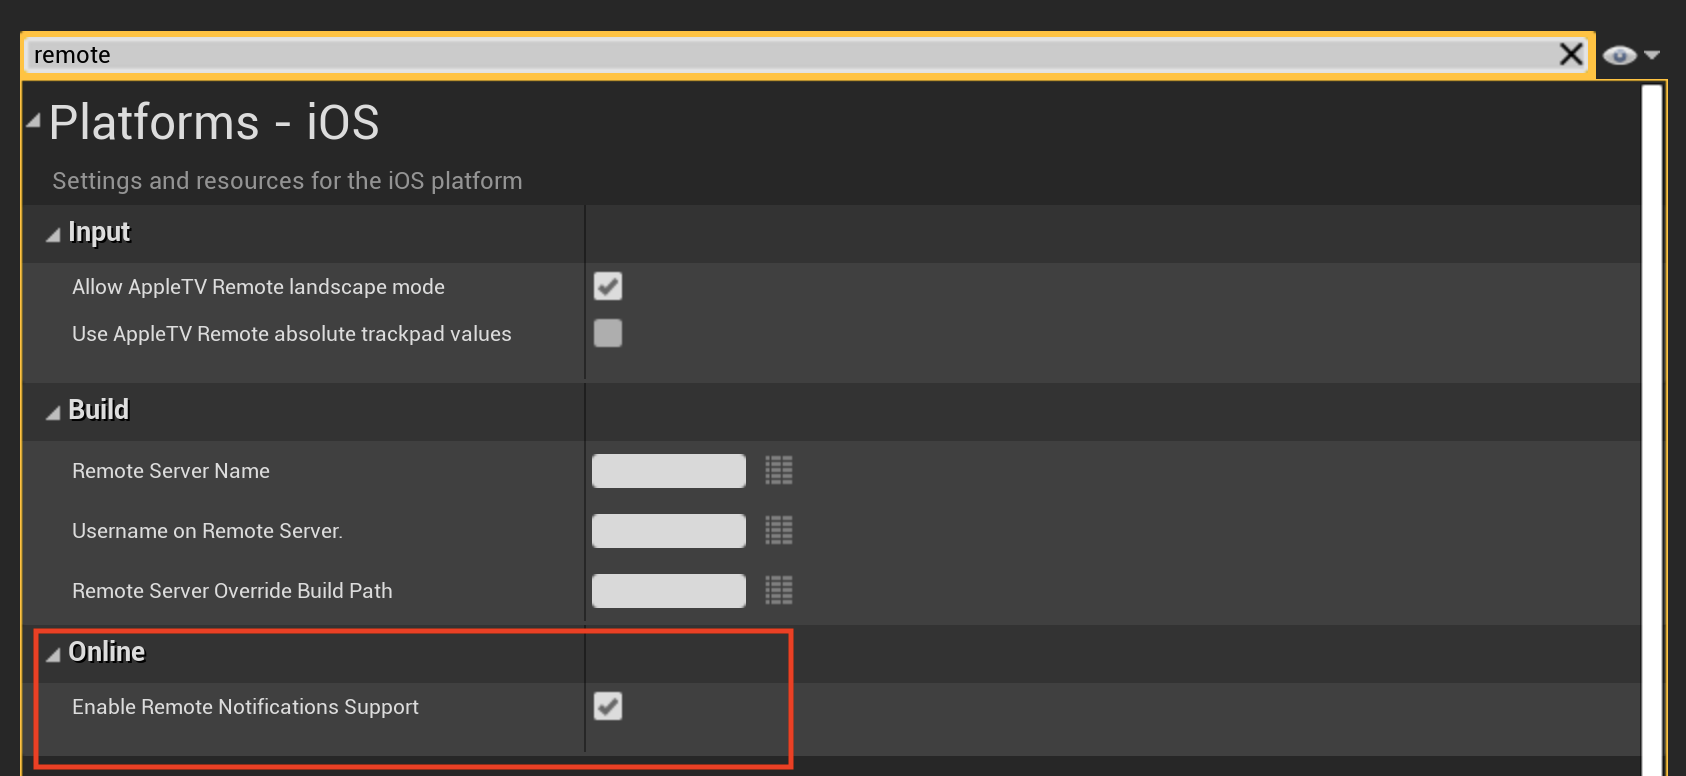
After Unreal Engine is running, open the Unreal IDE, go to Settings > Platforms -> iOS, and check Enable Remote Notification Support.
-
Under the setting -> Maps & Mods -> Game instance -> change the instance class to
PlatformGameInstance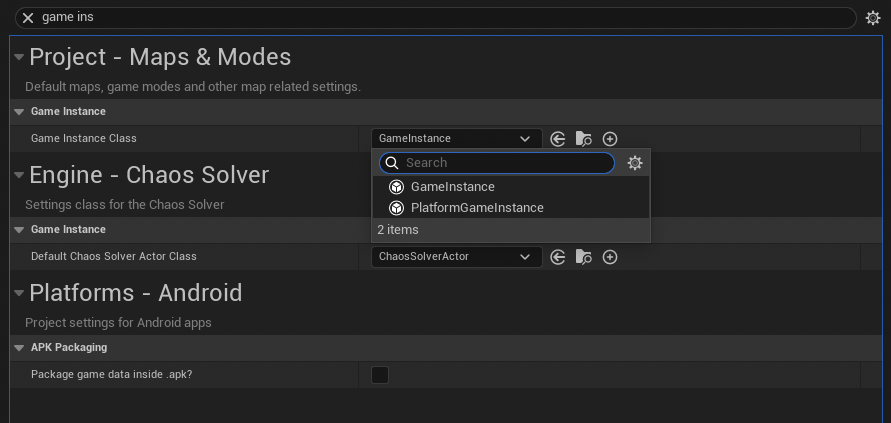
-
Configure the nodes under the relevant blueprint:
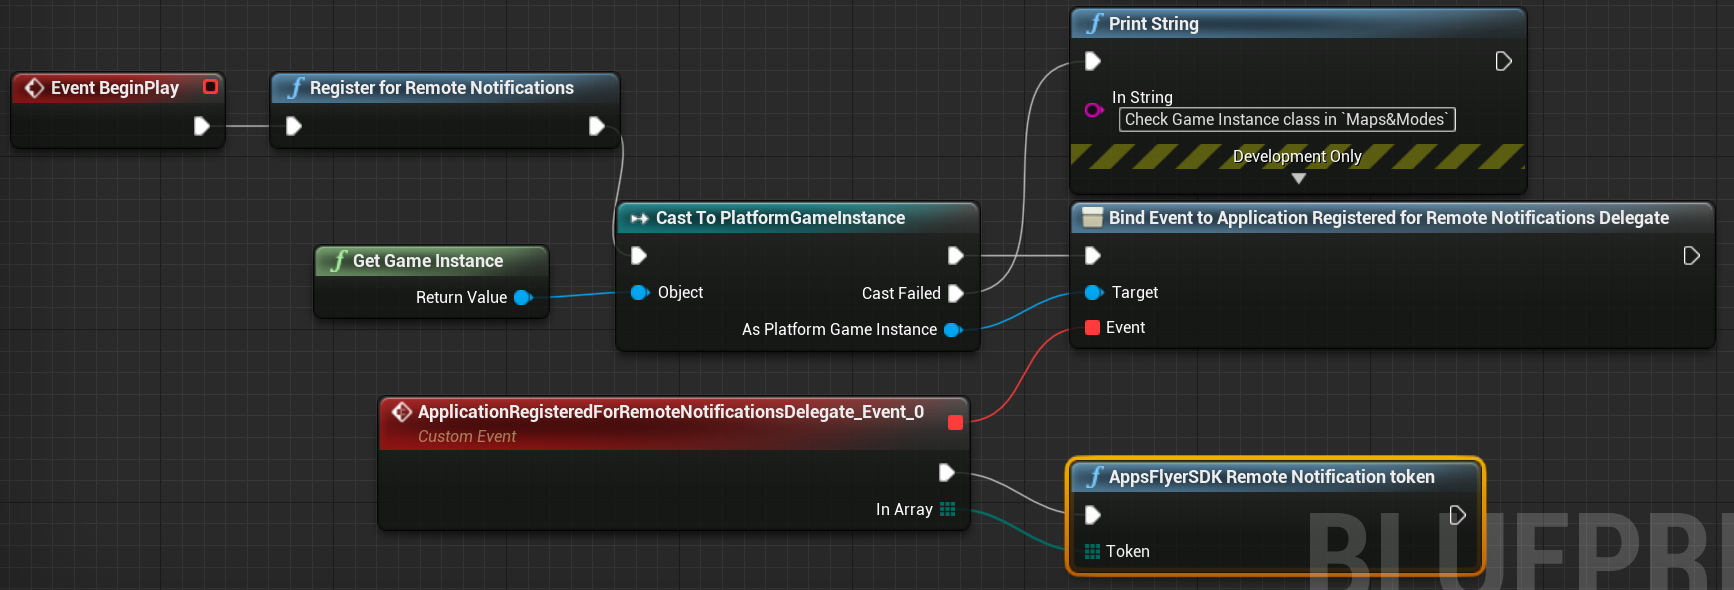
- Register for remote notification Will show a pop-up to the user from the OS, asking permission for remote notification
- The application registered for remote notifications delegate** call AppsFlyer uninstall API from iOS lifecycle
- AppsFlyerSDK remote notification token call AppsFlyer API for sending the token.
C++
static void setRemoteNotificationsToken(const TArray<uint8>& token);
Registers the device push‑token with AppsFlyer to enable uninstall measurement.
Debugging
When debugging, enable AppsFlyer debug logs and check for the Register endpoint

Android Uninstall
Complete the steps in the following article
-
Configure Firebase cloud messaging
-
Follow the app integration steps in this article.
-
Use the
appsFlyer.FirebaseMessagingServiceListenerservice, embedded in the SDK. This service extends theFirebaseFirebaseMessagingServiceclass, used for receiving the FCM Device Token:<application <!-- ... --> <service android:name="com.appsflyer.FirebaseMessagingServiceListener"> <intent-filter> <action android:name="com.google.firebase.MESSAGING_EVENT"/> </intent-filter> </service> <!-- ... --> </application>
Blueprint:
The same nodes as in iOS could be used for Android under the relevant blueprint. No API call is needed.

Set Additional Data
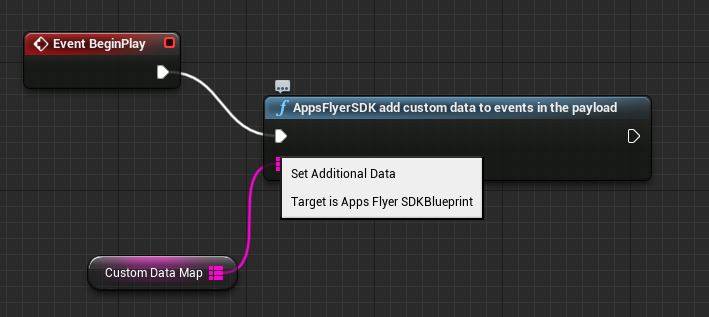
Add custom key-value pairs to the payload of the install event and any in-app event. The values will appear in raw-data reports.
IMPORTANT To include the additional data in the first SDK session, perform the following:
- Set the Automatically start the AppsFlyer SDK under the plugin setting to false.
- Call the
setAdditionalDataAPI before the call to thestartAPI
Blueprint:
C++
static void setAdditionalData(TMap<FString,FString> customData);
Validate And Log In App Purchase
Validates and logs an in-app purchase using the updated VAL V2 flow. This method should be called after a successful transaction. Results are broadcast via the OnValidateAndLogInAppPurchaseComplete callback delegate.
IMPORTANT:
- This API is iOS-only. On other platforms, it will return an error.
- The
productIdandtransactionIdmust be non-empty strings.
Parameters
- PurchaseDetails - A struct containing:
ProductId(FString) - The product identifier (required, non-empty)TransactionId(FString) - The transaction identifier (required, non-empty)PurchaseType(EAFPurchaseType) - EitherSubscriptionorOneTimePurchase
- PurchaseAdditionalDetails - Optional map of key-value pairs containing additional metadata associated with the purchase
Response
The result is delivered via the OnValidateAndLogInAppPurchaseComplete callback delegate, which provides a FAppsFlyerPurchaseResponse struct containing:
Status(EAFValidateAndLogStatus) - EitherSuccessorErrorResultJson(FString) - Raw AppsFlyer response serialized as JSON (on success)Error(FString) - Error message (on failure)
C++
static void ValidateAndLogInAppPurchase(
    const FAFSDKPurchaseDetails& PurchaseDetails,
    const TMap<FString, FString>& PurchaseAdditionalDetails
);
Example Usage
To receive the validation result, add the AppsFlyerSDKCallbacks component to an actor and bind to the OnValidateAndLogInAppPurchaseComplete delegate:
// In your Blueprint or C++ code
FAFSDKPurchaseDetails PurchaseDetails;
PurchaseDetails.ProductId = TEXT("com.example.product");
PurchaseDetails.TransactionId = TEXT("transaction_123");
PurchaseDetails.PurchaseType = EAFPurchaseType::OneTimePurchase;

TMap<FString, FString> AdditionalDetails;
AdditionalDetails.Add(TEXT("currency"), TEXT("USD"));
AdditionalDetails.Add(TEXT("price"), TEXT("9.99"));

UAppsFlyerSDKBlueprint::ValidateAndLogInAppPurchase(PurchaseDetails, AdditionalDetails);
For more information about in-app purchase validation, see the AppsFlyer documentation.
Updated about 1 month ago