Install SDK
Learn how to download and install the Android SDK.
Recommended

Get started with our SDK integration wizard
Installing the Android SDK
Install the Android SDK using your preferred method: Via Gradle, or manually.
Install using Gradle
Step 1: Declare repositories
In the Project build.gradle file, declare the mavenCentral repository:
// ...
repositories {
   mavenCentral()
}
/// ...
Step 2: Add dependencies
In the application build.gradle file, add the latest Android SDK package:
dependencies {
    // Get the latest version from https://mvnrepository.com/artifact/com.appsflyer/af-android-sdk
    implementation 'com.appsflyer:af-android-sdk:<<HERE_LATEST_VERSION>>'
    // For example
    // implementation 'com.appsflyer:af-android-sdk:6.12.1'
}
Manual install
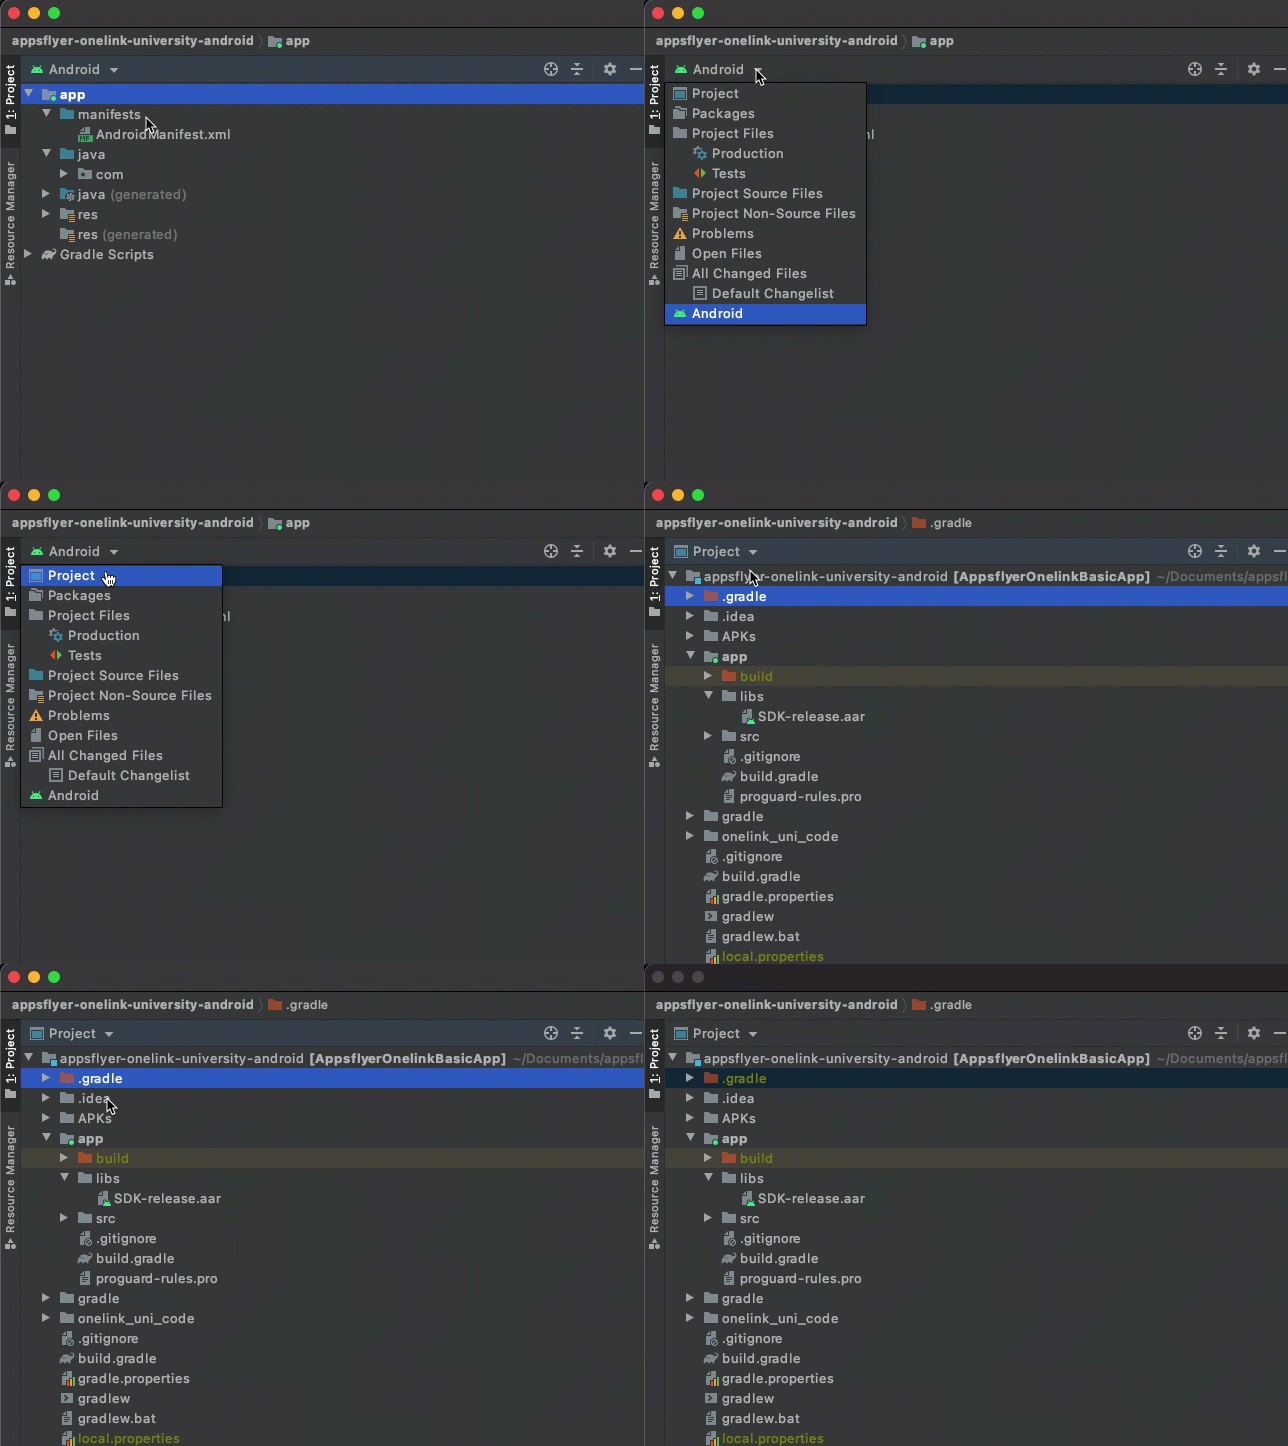
- In Android Studio, switch the folder structure from Android to Project:

- Download the latest Android SDK and paste it in your Android project, under app > libs.
- Right-click the
aaryou pasted and select Add As Library. When prompted, click Refactor.If prompted to commit to git, click OK
Setting required permissions
Add the following permissions to AndroidManifest.xml in the manifest section:
<manifest xmlns:android="http://schemas.android.com/apk/res/android"
    xmlns:tools="http://schemas.android.com/tools"
    package=YOUR_PACKAGE_NAME>

      <uses-permission android:name="android.permission.INTERNET" />
      <uses-permission android:name="android.permission.ACCESS_NETWORK_STATE" />

      ...

</manifest>
The AD_ID permission
In early 2022, Google announced a change to the behavior of Google Play Services and fetching of the Android Advertising ID. According to the announcement, apps targeting Android 13 (API 33) and above must declare a Google Play services normal permission in their AndroidManifest.xml file in order to get access to the device’s Advertising ID.
Starting V6.8.0, the SDK adds the AD_ID permission automatically.
Note
- If your app participates in the Designed for Families program:
- If using SDK
V6.8.0and above, you should Revoke the AD_ID permission.- If using SDK older than
V6.8.0, don't add this permission to your app.- For apps that target API level 32 (Android 12L) or older, this permission is not needed.
Apps that use SDK versions older than V6.8.0 and target Android 13 (API 33) and above must manually include the permission in their AndroidManifest.xml to have access to the Advertising ID:
<uses-permission android:name="com.google.android.gms.permission.AD_ID" />
Revoking the AD_ID permission
According to Google’s Policy, apps that target children must not transmit the Advertising ID.
When using SDK V6.8.0 and above, children apps targeting Android 13 (API 33) and above must prevent the permission from getting merged into their app by adding a revoke declaration to their Manifest:
<uses-permission android:name="com.google.android.gms.permission.AD_ID"
 tools:node="remove"/>
For more information, see Google Play Services documentation.
ProGuard rules
Optional
If you are using ProGuard and you encounter a warning regarding our AFKeystoreWrapper class, then add the following code to your proguard-rules.pro file:
AppsFlyer SDK ProGuard rules
-keep class com.appsflyer.** { *; }
-keep class kotlin.jvm.internal.** { *; }
Backup rules
The SDK's AndroidManifest.xml includes rules to opt out of backing up the Shared Preferences data. This is done to avoid retaining the same counters and AppsFlyer ID during reinstallation, thereby preventing the accurate detection of new installs or re-installs.
To merge the SDK backup rules with your app backup rules and to prevent conflicts, perform the following instructions for each use case.
Fix confilict with fullBackupContent=”true”
If you add android:fullBackupContent="true" in the AndroidManifest.xml, you might get the following error:
Manifest merger failed : Attribute application@fullBackupContent value=(true)
To fix this error, add tools:replace="android:fullBackupContent" in the <application> tag in the AndroidManifest.xml file.
Fix conflict with dataExtractionRule=”true”
If you add android:dataExtractionRules="true" in the AndroidManifest.xml, you might get the following error:
Manifest merger failed : Attribute application@dataExtractionRules value=(true)
To fix this error, add tools:replace="android:dataExtractionRules" in the <application> tag in the AndroidManifest.xml file.
Fix conflict with allowBackup=”false”
If you add android:allowBackup="false" in the AndroidManifest.xml, you might get the following error:
Error:
	Attribute application@allowBackup value=(false) from AndroidManifest.xml:
	is also present at [com.appsflyer:af-android-sdk:6.14.0] AndroidManifest.xml: value=(true).
	Suggestion: add 'tools:replace="android:allowBackup"' to <application> element at AndroidManifest.xml to override.
To fix this error, add tools:replace="android:allowBackup" in the <application> tag in the AndroidManifest.xml file.
Merge backup rules in Android 12 and above
If you’re targeting Android 12 and above, and you have your own backup rules specified (android:dataExtractionRules="@xml/my_rules"), in addition to the instructions above, please merge your backup rules with the AppsFlyer rules manually by adding the following rule:
<data-extraction-rules>
    <cloud-backup>
        <exclude domain="sharedpref" path="appsflyer-data"/>
    </cloud-backup>
    <device-transfer>
        <exclude domain="sharedpref" path="appsflyer-data"/>
    </device-transfer>
</data-extraction-rules>
Merge backup rules in Android 11 and below
If you’re also targeting Android 11 and lower, and you have your own backup rules specified (android:fullBackupContent="@xml/my_rules"), in addition to the instructions above, please merge your backup rules with the AppsFlyer rules manually by adding the following rule:
<full-backup-content>
    ...//your custom rules
    <exclude domain="sharedpref" path="appsflyer-data"/>
</full-backup-content>
Adding store referrer libraries
The AppsFlyer SDK supports several store referrer libraries. Using a store referrer improves attribution accuracy.
You only need to add the referrer dependency, the SDK takes care of the rest.
Google Play Install Referrer
Add the following dependency to your build.gradle:
dependencies {
    // ...
    implementation "com.android.installreferrer:installreferrer:2.2"
}
Google Play Install Referrer ProGuard rules
-keep public class com.android.installreferrer.** { *; }
Meta Install Referrer
Meta install referrer allows AppsFlyer to receive ad campaign metadata from a device’s local storage.
Meta Install Referrer basic flow
The basic flow of the Meta install referrer mechanism is as follows:
- Once the SDK initializes, it uses the app's Facebook App ID to make a request to the Meta Content Provider API, retrieving the stored metadata from the Facebook app.
- AppsFlyer SDK sends the install event, along with the attribution data, to the AppsFlyer servers.
Prerequisites
To support the Meta install referrer, the following is required:
- SDK: Integrate with Android SDK version 6.12.6 or higher.
- Facebook App Version: Users must have version 428.x.x or above installed on their device.
- Instagram App Version: Users must have version 296.x.x or above installed on their device.
Configure Meta Install Referrer Support
To enable Meta install referrer support make the Facebook App ID available to the SDK by adding it to the AndroidManifest.xml. This can be done either when integrating the Facebook SDK with the app or when integrating the AppsFlyer SDK with the app.
With Facebook SDK integrated
Refer to Facebook’s official guide to learn how to add the Facebook App ID to AndroidManifest.xml. The SDK will read the Facebook App ID from the meta-data tag.
Without Facebook SDK integration
Include the following tag in AndroidManifest.xml
<meta-data android:name="com.appsflyer.FacebookApplicationId" android:value="@string/facebook_application_id" />
Include in your strings.xml file:
<string name="facebook_application_id" translatable="false"><YOUR_FACEBOOK_APP_ID></string>
Huawei Install Referrer
Huawei Referrer is supported in SDK v6.14.0 and above.
Due to changes in the Huawei AppGallery store, previous versions of the AppsFlyer SDK are not able to fetch the referrer from the store.
Add the following repository to your Project's build.gradle:
repositories {
    //...
    maven { url 'https://developer.huawei.com/repo/' }
}
Add the following dependency in the app's build.gradle:
dependencies {
    // ...
    implementation 'com.huawei.hms:componentverifysdk:13.3.1.301'
}
If you are using ProGuard, add the following keep rules to your proguard-rules.pro file:
-keep class com.huawei.hms.**{*;}
Xiaomi GetApps store referrer
V6.9.0
Add the following dependency to your build.gradle:
dependencies {
  // ...
  implementation "com.miui.referrer:homereferrer:1.0.0.6"
}
Xiaomi GetApps store referrer ProGuard rules
-keep public class com.miui.referrer.** {*;}
Note
Samsung store referrer is supported out-of-the-box starting SDK
V6.1.1and does not require any additional integration.
Collecting AppSet ID
Starting with v6.17.0, the SDK can automatically collect the AppSet ID.
To enable this functionality, add the Google Play services AppSet dependency to your module-level build.gradle file:
dependencies {
    implementation 'com.google.android.gms:play-services-appset:16.1.0'
}
Once added, the SDK will collect the AppSet ID if it is available on the device.
To disable AppSet ID collection, use the disableAppSetId().
Google Play Integrity API
Starting with v6.17.1, the SDK has built-in integration with Google Play Integrity API.
This provides device‑integrity verification through Google Play.
You can read more about it here
If your app is distributed outside the Google Play Store, you can safely exclude this dependency by adding the following lines to your app's build.gradle:
implementation ("com.appsflyer:af-android-sdk:HERE_SDK_VERSION") {
    exclude group: 'com.google.android.play', module: 'integrity'
}

// For example:
// implementation ("com.appsflyer:af-android-sdk:6.17.1") {
//      exclude group: 'com.google.android.play', module: 'integrity'
// }
Known issues
Missing resource files
SDK V5
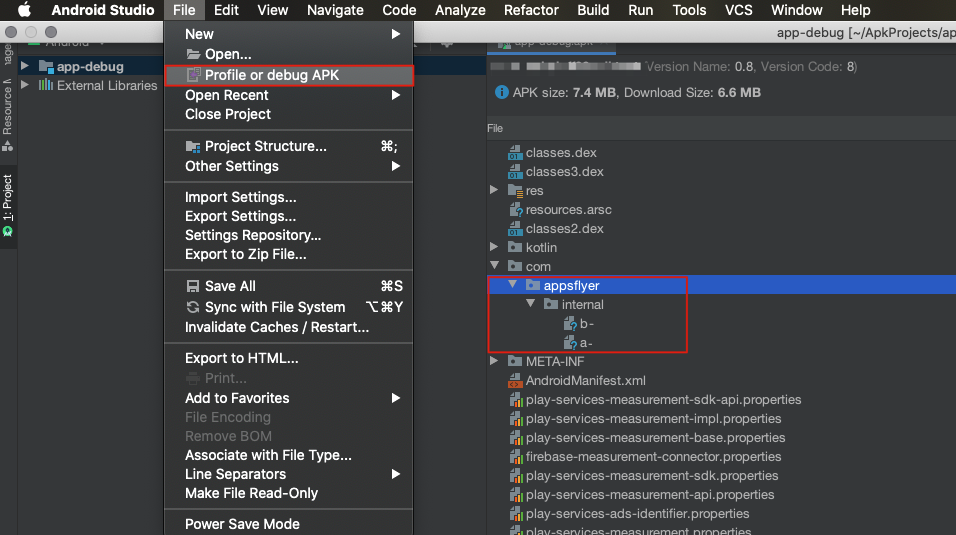
If you are using Android SDK V5 and above, make sure that in the APK file, in addition to the classes.dex and resources files, you also have a com > appsflyer > internal folder with files a- and b- inside.
Note: Before SDK 5.3.0, file names are a. and b.
Check that you have the required files by opening your APK in Android Studio:

If those files are missing, the SDK can't make network requests to our server, and you need to contact your CSM or support.
Boot Complete
If your app listens for LOCKED_BOOT_COMPLETED, make sure that all interactions with the SDK are initiated from the launcher activity. This precaution prevents the SDK from crashing when attempting to access SharedPreferences on a device that is still locked.
Updated 7 months ago